Showing posts with label knitting. Show all posts

Monday, August 2, 2010

Back!

Sorry I was MIA this weekend, I went to a wedding in Virginia and didn't have consistent internet access.  I'm back now and will be blogging regularly again :)

Wanna see some of the gorgeous pictures (out of more than 300 taken) from this weekend?  I thought so.
The first night we walked around Georgetown and saw the sights.

Of course I brought some knitting with me...

Ate a delicious cupcake (and got crumbs and frosting everywhere, I blame Matt)

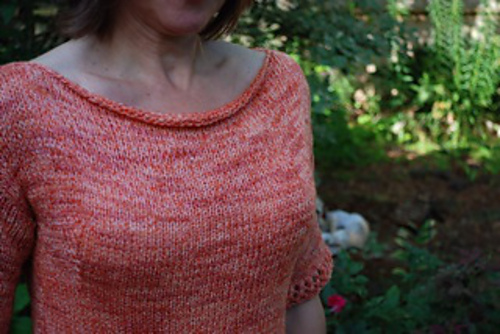
Got a chance to wear a beautiful sweater I just finished. Read about it here, Ravelry Deets here.

The Big Moment

We stayed at a beautiful B&B called the Norris House in Leesburg, VA and the wedding was held across the street at the Birkby House.  It was a phenomenal weekend but this week is back to my ever-growing to-do list and blogging regularly!

Monday, July 12, 2010

New Mexico Knitters! (And Wannabe Knitters!)

I'm teaching classes this Saturday!  I will be teaching beginning knitting and continental style knitting :)  More details here.

I would love to meet you and you're friends so be sure to sign up today!  Sign ups close soon, so don't hesitate.

Thursday, June 24, 2010

Knitting News

Whats going on on the knitting front over here at SillyLittleLady?  Lots 'o' stuff!

I'm finished with the knitting part of the collaboration with lylianmae and am writing up the final draft of the pattern, although I still need a name for it...

I'm trucking away on the Max Suit (click here to see the process), finished one leg, now working on the other, the end is coming closer and closer with every stitch and I can't wait to see what it looks like finished!

I'm also designing and working up another pattern, this time a cute little cardigan but I don't want to give away too many details.  Let's just say, it uses these materials ;)

Oh, and of course there is always that secret knitting that I worked on in Paris that I can't tell you about yet, but someday my good readers! Someday!

Monday, June 14, 2010

The Green T Turned Orange

Hello readers!  Today I want to share with you the creation of puravidaknits (Ravelry link).
She made her own version of the Green T! (Ravelry deets  or  get the pattern yourself!)
I absolutely love the color, don't you?  She used Alora from Rozetti Yarns
Isn't Pam just adorable?

Have you made your own project from one of my patterns?  Please share!  I love to see others' renditions :D

Wednesday, May 26, 2010

Free Circle Scarf/Cowl Pattern

 *I am traveling today, I'll be in Paris tonight!

Its about time for a free pattern wouldn't you say? I wrote up this one with the coming fall season in mind, large cocooning knits are in style and the cowl neck is always chic and cozy.  The stitch pattern provides a bit of texture and interest and the size gives ample room to double it around your neck.

The pattern can be made with a wide variety of yarns and gauges, so make something special for you!

Materials:
Worsted Weight Yarn (1 skein of Berroco Vintage was used in this example)
Size 11 circular needles
Stitch marker

CO 152
Knit in seed st pattern for 9 rows
*Knit for 7 rows
Purl 1 row
[YO P2tog] across row
Purl 1 row
Repeat from * 3 times more
Knit for 7 rows
Knit in seed st pattern for 9 rows
BO loosely

Finishing:
Weave in ends
Wear fashionably
Ravelry Details Here.

Tuesday, May 25, 2010

How Appropriate!

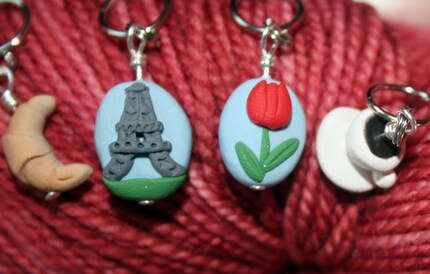
Aren't these the perfect stitch markers to find just before my trip? 

I will be enjoying croissants and coffee while taking in the views of the Eiffel Tower and colorful tulips :)

I have a set of the elephant stitch markers from weeones and got my mom a set of collie stitch markers too, don't have a pair? Why not?  They are too cute to pass up!

Tuesday, May 11, 2010

Citron


I used Southwest Trading Company's Bamboo for this project and have had the yarn in my stash for a long long time.  It was given to me (taken from?) my mother a long time ago and I wasn't quite sure what to do with it but when Citron came out, I knew. 

The project took my a little less than a week to complete, working on it in my off time (not plentiful during finals week) and I blocked it for a day before taking these pictures. 

Sorry no WIP photos, I'm very bad at taking those, but I think that since it was such a quick project, it can be forgiven this time.

It was nice to work on and complete a project that was just for me :)  Ravelry details here.

Tuesday, May 4, 2010

Tuesday Learn To Knit Day 14 - The I-Cord

Hello My Dear Students,

I know I didn't really come back and teach you new things the next week like I said I would, I got incredibly busy and these lessons fell by the wayside.  I know.  For Shame.  I apologize profusely and hope to get these back on track. 

This week, we're learning the I-cord.  I was teaching my friend how to knit this the other night and knew that I must show you all! The I-cord is used for a variety of things including straps on bags and various embellishments.  It is also good for knitting jewelry and those sorts of things.

Basically, knitting an I-cord is knitting in the round on a very small scale.

You will need two double pointed needles and whatever yarn you are using.

First, cast on probably 3 or 4 stitches (the more stitches, the thicker the I-cord.  Many patterns call for a specific number, so I'll leave that to them and give you the basics).

Instead of knitting on the side that the last cast on stitch is on, you will slide the stitches to the other end of the needle and knit the first cast on stitch first, instead of the last.

Continue with the rest of the stitches on the needle and when you complete the row, slide the stitches back to the other side of the needle (I hear making the type-writer sound "Ching" while doing this makes it easier ;))
Continue in this fashion until the I-cord is as long as desired and bind off.


If you have any questions, concerns or suggestions, please feel free to let me know :)

Friday, April 30, 2010

Coming Design

I have been working on this cropped, cabled, tie-front bolero ever since I found a similar one at a consignment shop up in Albuquerque a few weekends ago. I have knit up the main body piece and now I am just curious as to what you all think I should do for sleeves?

I like the idea of short flutter sleeves, but I also like the idea of tighter, to-the-elbow sleeves. The item I saw had long, over-exaggerated bell sleeves, but I don't have enough yarn for that.

Do you have any votes or other recommendations?

Tuesday, April 6, 2010

Tuesday Learn to Knit Day 13 - Inspiration

Instead of teaching you a new technique today, I am going to leave you with some inspirational knitting. We all need a little extra push sometimes and looking at the work of another knitter can be just what the doctor ordered. Now, I must be inspired to get back to my school work...


Tuesday, March 30, 2010

Tuesday Learn to Knit Day 12 - Knitting in the Round

Hello knitters! In this week's installment of my knitting lessons, I will be teaching you the fundamentals of knitting in the round. This type of knitting is perfect for hats, socks, bags and other 'round' type things, it creates one uniform piece of fabric so you don't have to sew up the sides later.

There are two ways to do this, with circular needles (circs) and double pointed needles (dpns).

In both cases, the most important thing about knitting in the round is to make sure your stitches don't get twisted. This can take some practice (as does everything with knitting). The way I do this is to make sure that the ridge created when casting on is all facing downward. If the little ridge is twisted or snakes around your needles, you won't get a flat project and you'll have to start over. Unless, of course, your project calls for twisted stitches, but most of the time they don't :)

I find circular needles a bit easier so I will start with those first.

Cast on the desired number of stitches just as you would with straight needles.

Stretch the stitches over the entire length of the needle so that they reach the other point.

Place a stitch marker (the little elephant in the picture) to mark the beginning of a round. A round is equivalent to a row on straight needles.

Knit as you would on straight needles, passing the stitch marker over from left to right as you come to it.

Now onto double pointed needles.

With double pointed needles, usually they come in a set of 4 or 5. Depending on the size of the project, you will have 3 or 4 in constant use (kind of acting as the loose chord holding circulars together) and one for knitting.

Cast on the desired number of stitches evenly over the 3 or 4 needles. this part can be a bit confusing and frustrating at first. To keep the needles from falling out or getting twisted, I hold the ones with stitches on them in my right hand along with the needle currently receiving stitches sticking out a bit farther than the others.


Make a triangle or square with them as shown to orient the stitches so that the first cast on and the last cast on are next to each other.

Place your marker (the elephant in the photo) and knit two or three stitches from the first needle to the 3rd (or 4th).


Now take your empty needle, needle 4 in this demonstration, and knit all of the stitches from needle 1 onto needle 4.


This will leave needle 1 empty, and you will then use needle 1 to knit all of the stitches from needle 2.

Then you will use needle 2 to knit all of the stitches from needle 3, and so on and so forth.

Tuesday, March 23, 2010

Tuesday Learn to Knit Day 11 - Stitch Patterns

Today we're not learning a new stitch so much as we are learning what cool things we can do with the stitches you already know, namely the knit and purl stitches.

These stitch patterns will let you practice both knitting and purling as well as show you some cool textures you can create with them!

First, stockinette:

This pattern consists of two rows: Knit one row, Purl the next row, simple, no?

Second, ribbing:

This pattern is very useful when making pieces that you would like to be stretchy, its pattern is some variation of the following:
CO 16
K2, P2 across row
You do this for all rows

Third, seed stitch:

This pattern is where you vary your knit and purl stitches, like so:
CO 16
K1, P1 across row
you will do this for all rows with an even number of stitches, for odd amounts, the second row will be to P1, K1 across all the stitches

Tuesday, March 9, 2010

Tuesday Learn to Knit Day 10 - A Simple Increase

Since I taught you two simple methods for decreasing the number of stitches in your knitting last week, this week I'm going to teach you an easy way to increase. Its called Knitting Through the Front and Back (kfb).

Ok, so you knit to where you would like the increase to take place,

You knit the next stitch (stitch to be increased with) as normal but do not slide the stitch off the left hand needle, instead, insert your right hand needle through the middle of the stitch and through the back


Then wrap the yarn around the right hand needle again and pull the right hand needle back through the center of the stitch, similar to normal knitting, and slide the stitch on the left hand needle off, you will have made two new stitches on the right hand needle.


This is what it looks like in the long run:

Now you know many of the basics of knitting and can start making all kinds of projects! I will continue to show you various knitting techniques, and if you have something specific you'd like to know, don't hesitate to ask! Questions? Comments? I want to hear those too :)
Related Posts Plugin for WordPress, Blogger...